8.9 KiB
Webcc Build Instructions
Overview
Build Dependencies
- Boost 1.66+ (asio, system, date_time, filesystem)
- OpenSSL (for HTTPS, optional)
- Zlib (for GZIP compression, optional)
- Googletest (for automation and unit tests, optional)
- CMake
OpenSSL and Zlib are optional since they could be disabled. See the build options below.
Googletest is also optional unless you want to build the automation and unit tests.
Build Options
The following CMake options determine how you build the projects. They are quite self-explanatory.
option(BUILD_AUTOTEST "Build automation test?" OFF)
option(BUILD_UNITTEST "Build unit test?" OFF)
option(BUILD_EXAMPLES "Build examples?" OFF)
option(BUILD_QT_EXAMPLES "Build Qt application examples?" OFF)

set(WEBCC_ENABLE_LOG   1 CACHE STRING "Enable logging? (1:Yes, 0:No)")
set(WEBCC_ENABLE_SSL   0 CACHE STRING "Enable SSL/HTTPS (need OpenSSL)? (1:Yes, 0:No)")
set(WEBCC_ENABLE_GZIP  0 CACHE STRING "Enable gzip compression (need Zlib)? (1:Yes, 0:No)")

set(WEBCC_LOG_LEVEL    2 CACHE STRING "Log level (0:VERB, 1:INFO, 2:USER, 3:WARN or 4:ERRO)")
Automation test is based on a real server: httpbin.org.
Integration
Webcc doesn't support CMake Install right now.
I suggest to integrate it to your project simply by source code. Just copy the webcc sub-folder into your project and add the related CMake options.
Please take a look at this example: https://github.com/sprinfall/webcc-integration.
Ubuntu
NOTE: Based on Ubuntu 18.04 LTS
Please install build-essential which includes the C++ compiler and more:
$ sudo apt install build-essential
CMake
Please refer to https://apt.kitware.com/.
OpenSSL
$ sudo apt install libssl-dev
Zlib
$ sudo apt install zlib1g-dev
Boost
Download the .tar.bz2 or .tar.gz from here.
Unpack and go into the directory (suppose Boost version is 1.74):
$ tar xzf boost_1_74_0.tar.gz
$ cd boost_1_74_0
Run bootstrap.sh to generate b2:
$ ./bootstrap.sh
Build and install:
$ sudo ./b2 --with-system --with-date_time --with-filesystem variant=debug link=static threading=multi install
Notes:
- Only build the specified libraries.
Asioitself is header only so doesn’t have to be built. - Only build static libraries (
link=static) - If you want to build release version libraries, set
variant=release. Thedebugandreleaselibraries have exactly the same name, so you cannot build them both at the same time. - Don’t forget the
sudosince the install prefix is/usr/local.
To clean the build, run b2 with target "clean":
$ ./b2 clean
The libraries are installed to /usr/local/lib. E.g.,
$ ls -l /usr/local/lib/libboost*
-rw-r--r--  1 adam  admin   540288 Apr 21 11:01 /usr/local/lib/libboost_date_time.a
...
The headers are installed to /usr/local/include/boost.
Googletest
$ sudo apt install libgtest-dev
Webcc
Create a build folder under the webcc root (or any other) directory, and cd to it:
$ mkdir build
$ cd build
Generate Makefiles with the following command:
$ cmake -G"Unix Makefiles" \
    -DBUILD_AUTOTEST=OFF \
    -DBUILD_UNITTEST=OFF \
    -DBUILD_EXAMPLES=ON \
    -DBUILD_QT_EXAMPLES=OFF \
    -DWEBCC_ENABLE_LOG=1 \
    -DWEBCC_LOG_LEVEL=0 \
    -DWEBCC_ENABLE_SSL=1 \
    -DWEBCC_ENABLE_GZIP=1 \
    ..
NOTE: You can create a script (e.g., gen.sh) with the above command to avoid typing again and again whenever you want to change an option.
Feel free to change the build options according to your need.
If everything is OK, you can then build with make:
$ make
Windows
Based on Visual Studio 2019 Community.
CMake
Download the latest CMake from https://cmake.org/ and install it.
Boost
Download the .7z or .zip from here. Unpack it.
Open x64 Native Tools Command Prompt for VS 2019 from Windows start menu (suppose you are only interested in a x64 build).
In the prompt, cd to the Boost root directory. Run bootstrap.bat to generate b2.exe:
Run b2.exe to start the build:
$ b2 --with-system --with-date_time --with-filesystem variant=debug variant=release link=static threading=multi address-model=64 stage
NOTE: Given address-model=64 b2.exe will not build any x86 libraries.
As you can see, we only need to build system, date_time and filesystem. Asio itself is a header-only library.
We don't install Boost to any other place (e.g., C:\Boost). We just stage it where it is.
In order for CMake to find Boost, please add an environment variable named Boost_ROOT pointing to the root directory of Boost.
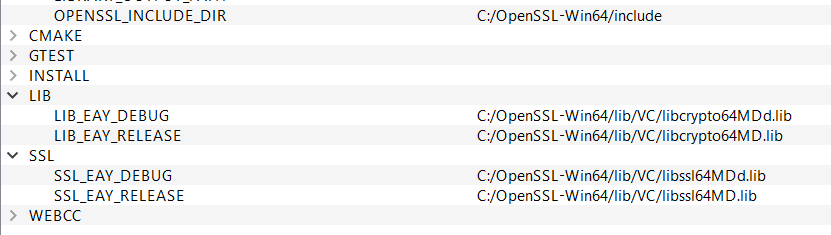
OpenSSL
Download from here.
The following installers (the suffix "g" might change according to revision) are recommended for development:
- Win64 OpenSSL v1.1.1g
- Win32 OpenSSL v1.1.1g
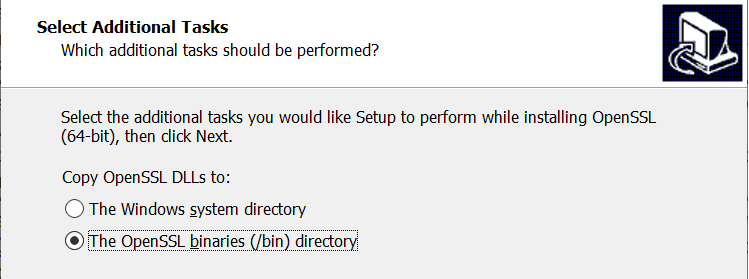
During the installation, you will be asked to copy OpenSSL DLLs (libcrypto-1_1-x64.dll and libssl-1_1-x64.dll) to "The Windows system directory" or "The OpenSSL libraries (/bin) directory". If you choose the later, remember to add the path (e.g., C:\Program Files\OpenSSL-Win64\bin) to the PATH environment variable.
OpenSSL can also be statically linked (see C:\Program Files\OpenSSL-Win64\lib\VC\static), but it's not recommended. Because the static libraries might not match the version of your VS.
The only drawback of dynamic link is that you must distribute the OpenSSL DLLs together with your program.
Zlib
Download Zlib from https://www.zlib.net/.
Use CMake to generate VS solution. Click Configure button.
By default, CMAKE_INSTALL_PREFIX points to a folder like C:/Program Files (x86)/zlib which is not what we want.
Change CMAKE_INSTALL_PREFIX to a folder where you would like to install all the third party libraries. E.g., D:/lib/cmake_install_2019_64 (NOTE: you must use "/" instead of "\" as path seperator!).
Remove all the INSTALL_XXX_DIR entries. Click Configure button again. Now the INSTALL_XXX_DIR entries point to the folder defined by CMAKE_INSTALL_PREFIX.
Leave all other options untouched, click Generate button to generate the VS solution.
Launch the VS solution and build INSTALL project for both Debug and Release.
Zlib should now have been installed to the given folder.
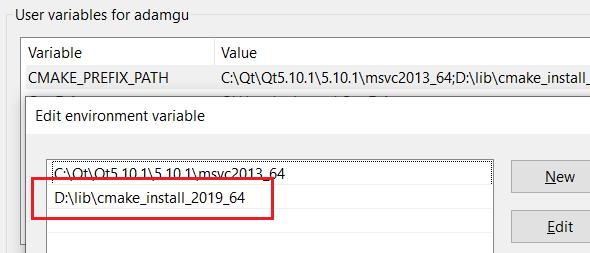
In order for CMake to find Zlib during the configuration of Webcc, please add an environment variable named CMAKE_PREFIX_PATH which points to the CMake install directory.
Googletest
Download the latest release of Googletest.
Use CMake to generate VS solution:
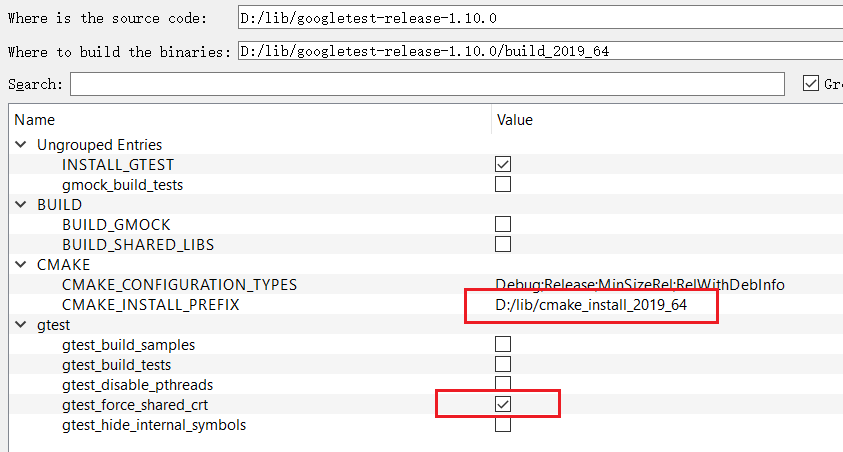
Please note the highlighted configurations.
The CMAKE_INSTALL_PREFIX has been changed to D:/lib/cmake_install_2019_64 (NOTE: please use "/" instead of "\" as path seperators!). This path should be added to an environment variable named CMAKE_PREFIX_PATH. Then, CMake can find this installed Googletest during the configuration of Webcc.
After build Googletest in VS, install it by building INSTALL project from the whole solution.
Webcc
Open CMake, set Where is the source code to Webcc root directory (e.g., D:/github/webcc), set Where to build the binaries to any directory (e.g., D:/github/webcc/build_2019_64).
Check Grouped and Advanced two check boxes.
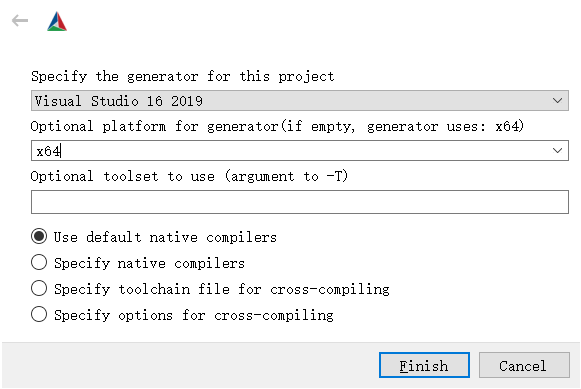
Click Configure button, select the generator and platform (win32 or x64) from the popup dialog.
In the center of CMake, you can see a lot of configure options which are grouped. Change them according to your need. E.g., set WEBCC_ENABLE_SSL to 1 to enable OpenSSL.
Click Configure button again. OpenSSL should be found.
Click Configure button again. If everything is OK, click Generate button to generate the VS solution.
Click Open Project button to open VS.